
Pencil Crafts Just in Time for the Holidays

 If creativity was a play, the pencil would be the assistant director. The pencil works behind the scenes as a vehicle for creativity to move from the mind to the page. It brings sketches, drawings, stories, and poetry to life and watches them live and breathe on the stage while waiting patiently in the wings. The pencil is the bridesmaid, never the bride. When the performance is lauded, the director and the players – the artist and the art – take all the credit. So what happens when the pencil becomes the star of the show? Check out these pencil crafts for a bit of inspiration!
Pencil Crafts
One project for your pencil is to create a pencil monogram.
You will need:
- Pencils (of course!)
- Glue (a glue gun works best)
- Construction paper
- A picture frame
- A knife or small saw for cutting the pencils
Directions:
1. Remove the back of the picture frame and glue the construction paper onto it.
2. Sketch the block letter(s) of your choice onto the construction paper (or print out a template).
3. Using the template, mark the pencils where you will need to cut them.
4. Carefully cut the pencils to size.
5. Glue the pencils to the construction paper.
6. Allow to dry flat (see instructions on glue bottle for length of time).
*Note: Don’t feel restricted to letters! The same process will also work for spelling out messages or making shapes – like a pencil turkey for Thanksgiving!
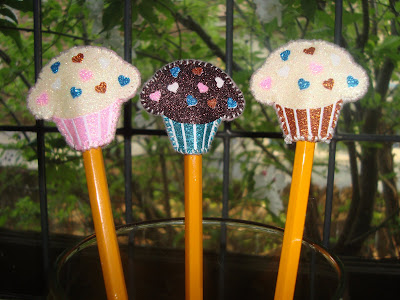
A good actor needs a good costume. Felt pencil toppers like these will ensure that your pencil is always the best dressed item in your trapper keeper (Do kids still have those? Or am I just old? On second thought – don’t answer that).
You will need:
- A pencil (did you see that coming?)
- Construction paper
- Felt
- Scissors
- A needle and thread or glue
- Glitter glue pens (optional, but encouraged)
Directions:
1. Sketch out the shape you want to top your pencil on construction paper. This will be your stencil If you’re having creativity block, I recommend team mascots, Halloween-themed shapes, or cupcakes like the ones pictured to start.
2. Cut out your stencil, and use it to cut the shapes you need out of felt. You will need two identical pieces (one for the front and one for the back). Make sure you leave enough room on the sides so that when you cut or glue it, it will fit on the end of a pencil.
3. Sew or glue the front piece and the back piece together. If gluing, I recommend placing it under your Harry Potter boxed set or an equally heavy object while it dries.
4. Once sewn or dry, decorate your pencil topper with glitter glue, googly eyes, anything you want!
If you try either of these projects – or any other pencil crafts for that matter – I’d love to see what you come up with. Link to your masterpieces and share your crafts in the comments!





Leave a Reply
Want to join the discussion?Feel free to contribute!